How to Remove Background in Hypic – A Step-by-Step Guide
If you’ve been using Hypic for a while, you already know how good it is at turning regular photos into polished edits with almost no effort. One feature that most people want to master is background removal, especially for social media posts, product shots, thumbnails, or portrait edits. So if you’ve ever wondered exactly how to remove background in Hypic without messing up the edges or losing details, this guide will walk you through it in the simplest way possible.
Hypic isn’t just about filters and AI art; it’s packed with smart tools that work surprisingly well for clean cutouts. And if you play around with hypic ai text prompts, you’ll notice the app gets even better at recognizing shapes and subjects. Background removal is one of those tools that feels almost automatic once you know how it behaves.
1. Why Hypic’s Background Removal Works So Well
A lot of apps claim they can remove backgrounds with one tap, but the results usually look jagged or washed out. Hypic uses a more refined AI model that identifies edges, hair strands, shadows, and even faint outlines around objects.
The accuracy comes from the same tech that powers Hypic’s AI art filters, beauty adjustments, and cutout tools. If you’ve ever tried using the pc windows version through an emulator, you probably noticed the AI works smoother when you’re on a bigger screen with better hardware, but the mobile app handles the job just fine too.
When people say Hypic makes editing feel “easy,” this tool is one of the reasons why. You don’t have to spend 20 minutes tracing around someone’s hair strand by strand. The AI handles the heavy lifting.
2. Step-by-Step: How to Remove Background in Hypic
Here’s the cleanest way to remove a background without getting uneven edges or weird shadows.
Step 1: Open Hypic and Choose Your Photo
Pick a photo that’s clear enough for the AI to identify the subject. Portraits, product photos, or images with contrast work the best. You can upload from your gallery, camera, or even from a saved folder inside your device.
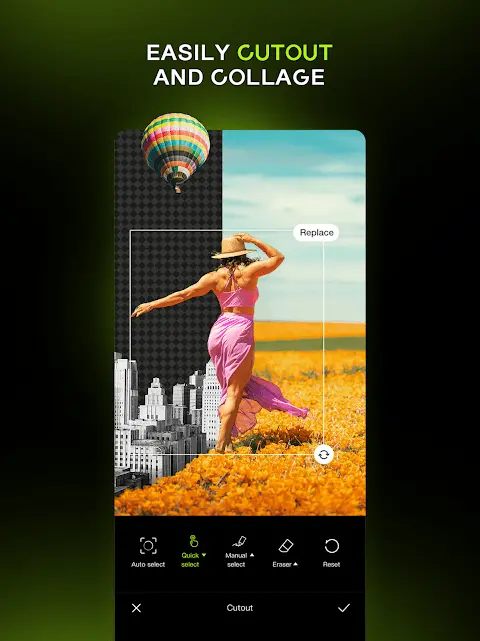
Step 2: Tap on the ‘AI Cutout’ Tool
This is where Hypic begins identifying the main subject. It uses the same engine found in many of its hypic ai photo editor features.
Step 3: Let the AI Process the Image
It usually takes a second or two. Hypic will outline your subject and remove everything behind it. If the lighting is balanced, the cutout comes out surprisingly clean.
Step 4: Use Manual Brush if Needed
Sometimes the AI overcuts or leaves small pieces behind. The brush, erase, and restore tools help clean up minor details.
Step 5: Add a New Background
This is where you get creative. You can:
- add solid colors
- place gradients
- choose an aesthetic background
- import your own custom backdrop
The “Replace Background” option helps you toggle between scenes without losing your main subject.
Step 6: Adjust Shadow, Blur, and Lighting
This part matters more than people realize. A cutout without natural shadow often looks fake. Hypic includes built-in sliders to help match your subject with the new background.
After a little tuning, your image looks like it was shot in the new environment.

3. Tips for Cleaner Background Removal
Since you’re here to learn how to remove background in Hypic, let’s add a few little tricks that people usually discover after editing dozens of photos.
Tip 1: Use Images With Good Lighting
The AI performs better when the subject stands out clearly. Dim or noisy photos confuse the cutout model.
Tip 2: Avoid Busy Backgrounds if You Want a Perfect Cut
The AI can still handle them, but the accuracy drops if there are lots of overlapping objects.
Tip 3: Use the Desktop Workflow if You’re Doing Bulk Edits
If you’re editing multiple product photos or long sessions of images, running the pc version through an Android emulator gives you more control and a bigger view of your cutouts.
4. What About Using Hypic Mod for Background Removal?
Some people switch to a modded version of Hypic because it unlocks premium features like HD export, extra filters, and a wider range of AI removal tools. But background removal works the same way in both versions — the only difference is the extra customization options after the cutout.
If you’ve used any of the older version, you may remember when the cutout tool wasn’t as sharp. The newer builds have a stronger segmentation model, which explains why the results look more natural now.
5. Creative Ways to Use Hypic Background Removal
Removing backgrounds isn’t just for “clean white backdrop” product shots. You can use this tool for dozens of things:
Aesthetic Instagram Edits
Create a pastel wallpaper behind your portrait.
YouTube Thumbnails
Replace messy backgrounds with something that matches your branding.
Digital Art
If you’re a fan of AI illustrations, mix your cutouts with dreamy backgrounds or blend layers to give your edits more depth.
Short Social Videos
Even though Hypic is mainly known for photos, you can use the cutout tool to prep assets for short clips.
If you ever decide to use create double ai exposure effects, background removal becomes even more important because it helps your subject blend smoothly in layered art.
6. How Hypic Performs Across Devices
The experience varies depending on what device you’re using.
Android
Most users run Hypic on Android phones. The background removal tool is fast and handles even busy photos decently.
iPhone Users
Some editors prefer the iOS version for slightly better stability and smoother exports, especially when working with high-resolution photos.
Tablet Workflow
More screen space makes manual cleanups easier. If you edit product photos, a tablet gives you the extra comfort you didn’t know you needed.
7. Pros of Using Hypic for Background Removal
Here’s what makes Hypic’s background removal tool so useful:
- Quick, near-automatic cutouts
- Clean edges even around hair
- Helpful manual brushes
- Easy shadow and lighting adjustments
- Enough AI tools to fix common irregularities
- Multiple ready-made backgrounds to drop behind subjects
If you’re the type who likes experimenting, the combination of AI expand, AI effects, and cutouts can give you some unique edits.
8. Limitations You Should Know
Every app has flaws, and Hypic is no different. These won’t stop you from learning how to remove background in Hypic, but it’s good to keep them in mind:
- Doesn’t always capture tiny details, especially on low-quality photos
- Busy backgrounds sometimes confuse the AI
- HD export is limited in the free version
- Modded APK versions come with privacy risks
- Large photos take slightly longer to process
If you’re working with multiple images or batch editing, you might notice the app slowing down on older phones.
9. Safety Tips Before Downloading Hypic
If you’re installing the original version from the Google Play Store, you’re safe. But if you decide to download the Hypic Mod APK, always:
- use trusted sources
- check the file before installing
- avoid enabling unknown sources permanently
- back up your photos
- avoid logging in with sensitive accounts
Hypic is owned by ByteDance Pte, so the official app maintains a decent level of privacy. The modded versions vary widely depending on where you download them.
Final Thoughts
Learning how to remove background in Hypic is simple once you know where each tool is and how the AI reacts to different types of photos. For clean product shots, portrait edits, thumbnails, or layered art, the app handles cutouts better than many paid editors. If you give yourself a few tries and experiment with lighting, shadows, and replacement backgrounds, you’ll start seeing sharper results.
Hypic’s AI tools keep improving, and as long as you’re patient enough to fine-tune the details, the cutout tool can become your go-to editor for quick and clean background removal.

